I ran into a situation recently where I experienced some difficulty getting Crystal RAS 2008 to work properly when it was installed on a Windows Server 2008 R2 (x64). The first issue appeared when we installed the ODBC drivers but they did not appear in the ODBC Data Source Administrator. It turns out that in 64 bit versions of Windows there are actually two ODBC Data Source Administrators, one for 64 bit drivers and one for 32 bit drivers, however only the 64 bit Administrator is available in the Control Panel/Administrative Tools and the drivers we were using were 32 bit. To access the 32 bit administrator, we needed to manually find and run the following file: C:\Windows\SysWOW64\odbcad32.exe . Now we could see the ODBC drivers we installed.
Once we figured out why the ODBC drivers we not showing up in the ODBC Data Source Administrator and worked through that, our next issue appeared. We were able to create System DSN’s (using the Oracle driver) and verify that they were set up correctly using the “Test Connection” feature, but for some reason every time we ran a report we would get an error message: Failed to open the connection. Details: [Database Vendor Code: 12154]. This error message translated into ORA-12154: TNS could not resolve the connect identifier specified.
After some extensive research, it turns out that this was a fairly common issue for people using 32 bit ODBC drivers on a 64 bit Windows OS. I actually confirmed the same error message (ORA-12154) by installing Crystal Designer on the server and running a report directly from Crystal using the same ODBC connection (thereby bypassing the RAS server). As it turns out, the parentheses in the default file location, C:\Program Files (x86), cause problems with the ODBC drivers. All we had to do to fix the problem was install RAS in a directory that did not contain parentheses – I put it in C:\CrystalReports. Finally after much aggravation, RAS was working.
Thursday, May 13, 2010

Thursday, March 4, 2010
External Mail with Attachments
I recently had a request from a client to add an action to Contact Center that emails the 'Requested By' person a PDF explaining how to use the ESS application. The same basic method can be used to email just about any file to anyone with a People record in TRIRGA (or even someone who does not have a people record if you create a custom GUI to enter the email address).
Anyhow, here are the basic steps:
- In the Application Setup manager there is a business object called Offline Content. Add a new record in the BO, giving it a Name and ID and attaching the file you want to send to the Offline Content field
- Create a new query that returns only the offline content record you just created - this will be used in the workflow below
- Create a new workflow that first runs the query above to get the content and then retrieves the person you want to email.
- Once you have a handle on the content and person (or at least their email address), add a Create task to create a Mail/Email Message and map (or hard code) the Body and Subject fields.
- Next, add a Create task to create a Mail/Email Address record that will be your From address (you must have a To and From email address). Map or hard code the Address and Name fields
- Add two Associate tasks, both using the string 'Email From Address', to associate the From address to the Email Message
- Repeat steps 5 & 6 for a To address, this time using the string 'Email To Address' for your Associate tasks
- Now, add a Create task to create a Mail/Email Attachment. In this step map to the Content field from the triOfflineContentBI field on the Offline Content record (from the Query task in step 3)
- Add one more Associate task the associates the Email Message to the Email Attachment using the string 'Email Attachment'
- Finally, use a Trigger Action task to trigger SEND on the Email Message
An decent example of sending an email message with binary content exists out of the box in the current TRIRIGA application. Refer to the triRETransactionPlan - Synchronous - Send Offline Transaction Template workfow in the Project module for reference.
Tuesday, January 12, 2010
Extracting Security Data
If you need the details on how your security groups are set up, below is some SQL to extract that data. The query below only pulls the security at the GUI level, but that is the level that contains the most information. If you only want a summary of read/write/delete access add ass.service_id > 50 to the where clause. That will prevent GUI and section action access from displaying. Here is a link to a Crystal report using this query to put the data in a more user friendly format.
SELECT
spec.spec_name group_name,
sa.module_name system_name,
'GUI' object_type,
gui.gui_name object,
ass.service_label permission,
ass.service_id
FROM app_object_permission aop
JOIN ibs_module sa ON
sa.module_id = aop.application_id
JOIN application_service ass ON
ass.service_id = aop.service_id
JOIN ibs_spec spec ON
spec.spec_id = aop.group_id
JOIN gui_header gui ON
gui.gui_id = aop.template_id
WHERE
spec.spec_name != 'Admin Group' AND
aop.tab_id = -1 AND
aop.section_id = -1 AND
aop.field_id = -1
ORDER BY 1, 2, 3, 4, 6
SELECT
spec.spec_name group_name,
sa.module_name system_name,
'GUI' object_type,
gui.gui_name object,
ass.service_label permission,
ass.service_id
FROM app_object_permission aop
JOIN ibs_module sa ON
sa.module_id = aop.application_id
JOIN application_service ass ON
ass.service_id = aop.service_id
JOIN ibs_spec spec ON
spec.spec_id = aop.group_id
JOIN gui_header gui ON
gui.gui_id = aop.template_id
WHERE
spec.spec_name != 'Admin Group' AND
aop.tab_id = -1 AND
aop.section_id = -1 AND
aop.field_id = -1
ORDER BY 1, 2, 3, 4, 6
Tuesday, November 17, 2009
Setting Up Bulk Print Functionality
If you have a need to bulk print multiple objects, such as work tasks, you can use the following process to create a bulk print utility.
1. Create a Crystal report that works successfully on the Print Preview tab
2. Create an object/GUI to use for bulk printing
3. Include a query section on the bulk print GUI that allows you to find and associated tasks using a unique association string
4. Write a query that gets the record id of the tasks with an association filter using the string you defined above to tasks (i.e., get all tasks associated to the bulk print object with a string of ‘has task’ or whatever you defined)
5. Create a URL section action on the bulk print GUI similar to this: /html/en/default/common/RepBuilder.jsp?source=bulk&docId=XXXXXX&showFilters=false&queryName=triTask_triWorkTask_cus___triWorkTask___Selected___Tasks___Bulk___Print
6. Replace the value after ‘docId=’ with the Document ID of the Crystal report (if you mouse over the doc in Document Manger you will see the Doc ID in the bottom left corner of your screen)
7. Replace the value after ‘queryName=’ with the name of your filter query (look at the format above it Module_Object_Query Name with a triple underscore for spaces between words in the query name)
8. You should be ready for testing at this point, associate one or more work tasks to the bulk print GUI and call the action you defined above.
1. Create a Crystal report that works successfully on the Print Preview tab
2. Create an object/GUI to use for bulk printing
3. Include a query section on the bulk print GUI that allows you to find and associated tasks using a unique association string
4. Write a query that gets the record id of the tasks with an association filter using the string you defined above to tasks (i.e., get all tasks associated to the bulk print object with a string of ‘has task’ or whatever you defined)
5. Create a URL section action on the bulk print GUI similar to this: /html/en/default/common/RepBuilder.jsp?source=bulk&docId=XXXXXX&showFilters=false&queryName=triTask_triWorkTask_cus___triWorkTask___Selected___Tasks___Bulk___Print
6. Replace the value after ‘docId=’ with the Document ID of the Crystal report (if you mouse over the doc in Document Manger you will see the Doc ID in the bottom left corner of your screen)
7. Replace the value after ‘queryName=’ with the name of your filter query (look at the format above it Module_Object_Query Name with a triple underscore for spaces between words in the query name)
8. You should be ready for testing at this point, associate one or more work tasks to the bulk print GUI and call the action you defined above.
Thursday, August 13, 2009
Monitoring Java Memory
If you find your app server running out of Java heap space, or just want to monitor it to look for issues, running the Java Monitoring and Management console is a relatively easy method to accomplish this. To set this up, you will need to add the following to the startup properties for the JVM, typically the run.bat (or run.sh) file:
-Dcom.sun.management.jmxremote.port=6778
-Dcom.sun.management.jmxremote.authenticate=false
-Dcom.sun.management.jmxremote.ssl=false
This starts the JVM with a monitoring server on port 6778 (you can pick any port you want, just change the number above). Then, from your desktop (you must have the JDK 1.5+ installed, not just the JVM) you would run the following at a command prompt:
java -jar jconsole.jar appserver:6778
Where "appserver" is the hostname or IP address of the app server. If jconsole isn't in your path, you should be able to find it in the "bin" directory under your JDK installation. That should pop up a handy console window where you can monitor various statistics on the server. One thing to watch for is "PS Old Gen" completely filling up, as this will make your TRIRIGA server non-responsive.
If you don't have the JDK installed (but have a JVM) you can still access the JConsole by just downloading the jconsole.jar file to your local system and running the above command from the same directory.
Thanks to Eric Glass for this tip!
-Dcom.sun.management.jmxremote.port=6778
-Dcom.sun.management.jmxremote.authenticate=false
-Dcom.sun.management.jmxremote.ssl=false
This starts the JVM with a monitoring server on port 6778 (you can pick any port you want, just change the number above). Then, from your desktop (you must have the JDK 1.5+ installed, not just the JVM) you would run the following at a command prompt:
java -jar jconsole.jar appserver:6778
Where "appserver" is the hostname or IP address of the app server. If jconsole isn't in your path, you should be able to find it in the "bin" directory under your JDK installation. That should pop up a handy console window where you can monitor various statistics on the server. One thing to watch for is "PS Old Gen" completely filling up, as this will make your TRIRIGA server non-responsive.
If you don't have the JDK installed (but have a JVM) you can still access the JConsole by just downloading the jconsole.jar file to your local system and running the above command from the same directory.
Thanks to Eric Glass for this tip!
Wednesday, June 17, 2009
Using Google Charts in TRIRIGA
A customer asked a coworker of mine to embed some dashboard-style graphs on his portal to look something like this: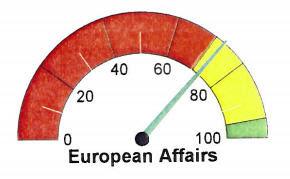
You can do pretty much exactly that with the Google Charts API; here is an example:

http://chart.apis.google.com/chart?chs=225x125&cht=gom&chtt=European%20Affairs&chl=72&chd=t:72
This will render a PNG image with the following parameters:
chs: chart size, e.g. 225x125
cht: chart type, here "gom" = Google-O-Meter
chtt: chart title
chl: label at end of arrow, here I just used the data value
chd: chart data, here "t:72" gives a value of 72
You can embed this in an HTML document by doing something like:
More information is here:
http://code.google.com/apis/chart/basics.html
Many thanks to Eric Glass for this cool solution!

You can do pretty much exactly that with the Google Charts API; here is an example:
chs: chart size, e.g. 225x125
cht: chart type, here "gom" = Google-O-Meter
chtt: chart title
chl: label at end of arrow, here I just used the data value
chd: chart data, here "t:72" gives a value of 72
You can embed this in an HTML document by doing something like:
<img src="http://chart.apis.google.com/chart?chs=225x125&cht=gom&chtt=European%20Affairs&chl=72&chd=t:72"/>
More information is here:
http://code.google.com/apis/chart/basics.html
Many thanks to Eric Glass for this cool solution!
Monday, June 15, 2009
Concurrent License Usage
As part of an effort to monitor maximum concurrent license usage, a colleague of mine wrote a SQL script to query ACTIVE_SESSION_USER joined to T_LICENCEDETAILS. He then created a batch script to run the the SQL script with SQLplus and another batch script to concatenate the results. The results were dumped to a .csv file every five minutes. Once the sample data had been gathered, he pulled it into Excel for analysis and created this nifty chart:
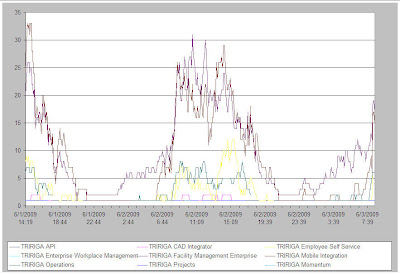
The SQL used to gather the data behind the chart is:
column dcol new_value mydate noprint
select to_char(sysdate,'YYYYMMDDHH24MISS') dcol from dual;
set echo off
set feedback off
set linesize 100
set pagesize 0
set sqlprompt ''
set trimspool on
spool c:\temp\concurrency\&mydate._output.csv
select to_char(sysdate, 'MM/DD/YYYY HH24:MI:SS')||','||b.username||','||b.peoplefullname||','||c.userlicence
from tridata9.active_session_user a, tridata9.t_myprofile b, tridata9.ibs_spec_assignments isa, tridata9.t_licencedetails c
where a.user_id = b.spec_id
and b.spec_id = isa.spec_id
and isa.ass_spec_id = c.spec_id;
spool off
exit
Thanks Chris for your contribution!

The SQL used to gather the data behind the chart is:
column dcol new_value mydate noprint
select to_char(sysdate,'YYYYMMDDHH24MISS') dcol from dual;
set echo off
set feedback off
set linesize 100
set pagesize 0
set sqlprompt ''
set trimspool on
spool c:\temp\concurrency\&mydate._output.csv
select to_char(sysdate, 'MM/DD/YYYY HH24:MI:SS')||','||b.username||','||b.peoplefullname||','||c.userlicence
from tridata9.active_session_user a, tridata9.t_myprofile b, tridata9.ibs_spec_assignments isa, tridata9.t_licencedetails c
where a.user_id = b.spec_id
and b.spec_id = isa.spec_id
and isa.ass_spec_id = c.spec_id;
spool off
exit
Thanks Chris for your contribution!
Subscribe to:
Posts (Atom)